Since AI and to be more specific ChatGPT is taking the world by storm, it is never been a better opportunity to see if ChatGPT can be integrated with WordPress websites. In this article, we will discuss how to integrate ChatGPT with WordPress, what are the ways to use ChatGPT in our WordPress website, and what are the advantages of using ChatGPT in WordPress websites.
Let’s waste no time and start with the article.
What is ChatGPT?
ChatGPT is an artificial intelligence (AI) model developed by OpenAI that uses natural language processing (NLP) to generate human-like responses to text-based input. It is trained on a vast amount of text data, allowing it to understand and respond to a wide range of topics and questions.
What are the Advantages of Using ChatGPT with WordPress Websites?
ChatGPT can be used with a WordPress website to generate content and offer tailored support to visitors. You may build a chatbot that can reply to user inquiries and provide responses in real-time by integrating ChatGPT with a chatbot plugin. This can assist you in improving user experience on your website, generating leads, and customer service.
How to Integrate ChatGPT with WordPress?
- Create an account on the OpenAI website.
- Obtain an API key for the GPT model: Sign-in to your OpenAI account > View API Keys > USER > API Keys. Or simply click on this link to go to the same page.
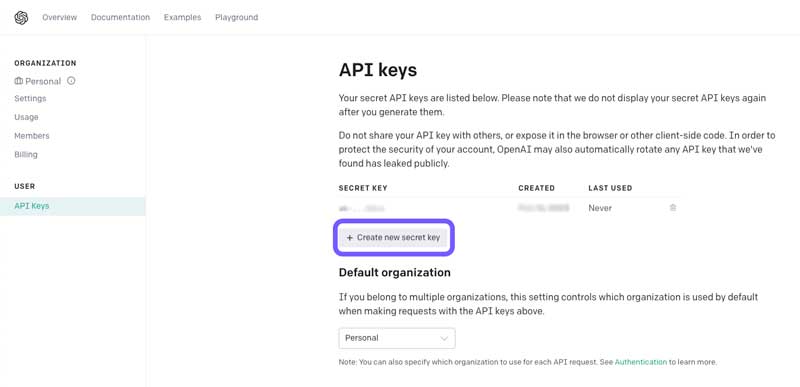
- Now, create your first Secret Key by clicking on “+ Create new secret key” and save the key for later use in the process.
- Now, login to your WordPress admin page and go to Plugins and click on Add new.
- In the top right search bar, search for “GPT AI Power”.
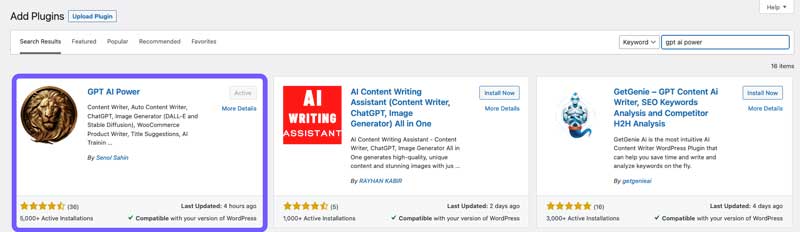
- Once found, click on install then activate the plugin.
- In the left-hand side, click on GPT AI Power the go to Settings page of the plugin.
- Click on “AI Engine” section and head over to “API Key” in the bottom of this section.
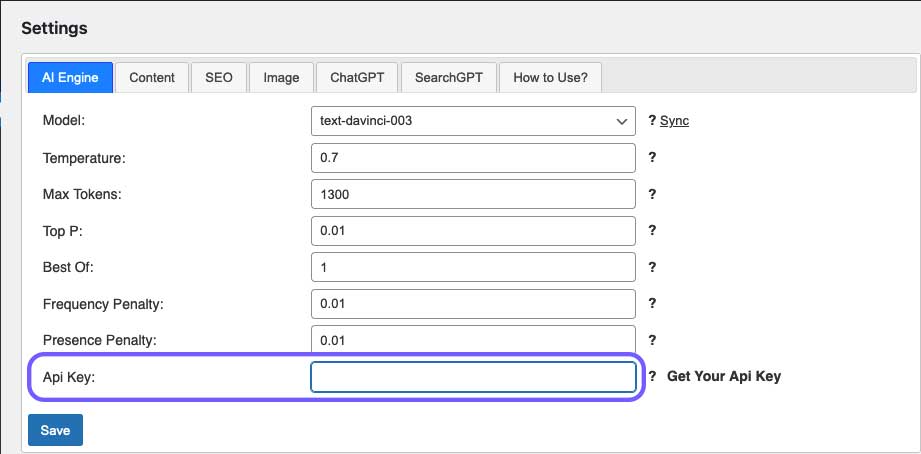
- Paste your secret key which you made in your OpenAI account, then click on Save.
- Now, go to Posts and click on Add new. Scroll all the way down until you see “GPT-3 AI Content Writer & Generator”.
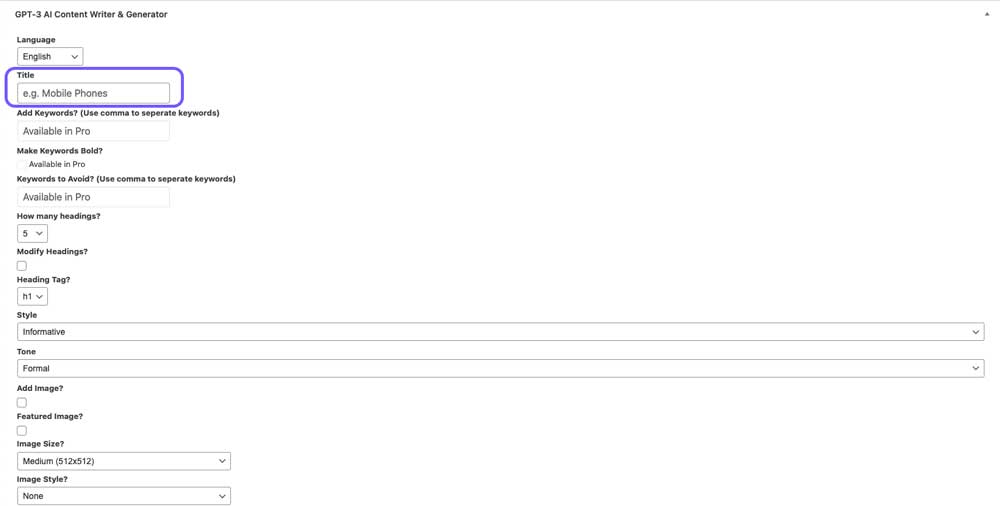
- Here, you can change the parameters based on what you want the AI to do for you. However, the main point is to prompt the AI to write you a full content for your next blog post.
- In the “Title” section, ask the AI with your prompt and click on “Generate” at the bottom of the same section.
- Wait, and be patient here while the AI is writing you blog post. Once it has written the blog, it gives you the finished blog content in the content section.
- That is all, you now have a ready blog which you can tweak and publish as your next blog.
Lastly, you can add the AI Interface to any of your blogs and pages for your users to interact with. Here is an example using a simple shortcode.
[wpaicg_chatgpt]
Bonus Tips
This cool plugin you installed on your WordPress website can also be integrated with DALL-E which is another AI to generate images. But, enough for today, another post will be published soon about how to integrate DALL-E with GPT AI Power to generate images for your blog posts.
You can also check other blogs (via this LINK) to learn more about WordPress and its features.

This article was really helpful and worked exactly like you explained in your blog. I didn’t know you can integrate chat GPT on a WordPress website until i saw your blog.